|
|
Here come da Riv!
Since OPGI now has a spectacular new line of parts (I’m referring to the 1963-’76 Buick Riviera line, of course), I figured it was time to celebrate with a story here on Colin’s Corner.
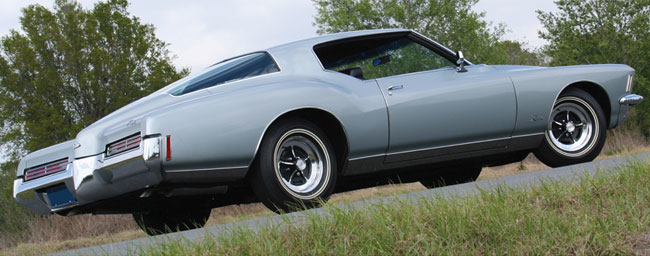
I chose my all-time favorite Rivvy—actually one of my all-time favorite cars, period—the 1971 Riviera, by our friends behind the Tri-Shield badge.
By Richard Rozum
Think of contemporary art as the talent of expressing one’s emotions through sculpture. Can there be any finer example of contemporary art than the 1971 Buick Riviera? Many fine motorcars express art in different ways, some think of it as very routine and mainstream, while others favor the art of attaching as many chrome wiz-bangs as possible from one end to the other. But at Buick you’ll find the truest expression of modern contemporary fine art in the Riviera. The Riviera has no need for excess chrome and plastic because the style is sculpted in from birth. Just gaze at the styling of the Riviera, notice there is very little in the way of gizmos and gadgets attached to the exterior of the car. Yet it still stands out, far and away, above the crowd. That is art. It’s not tacked on, it’s designed in, and that is what makes a truly exceptional vehicle.
Open the door and enter the relaxed world of Riviera. Inside you have a choice of a sumptuously padded vinyl bench seat or the ultra comfortable bucket seats featured here. The bucket seats have contours that “considerably relate to the relaxed human form.” The seats are plush yet comfortable enough for the longest road trips. Other interior trim is tastefully refined. The optional center console is canted towards the driver for easy visibility. The instrument panel is padded and heavily sculpted giving the driver the feeling of being in a cockpit with all controls at the driver’s fingertips.

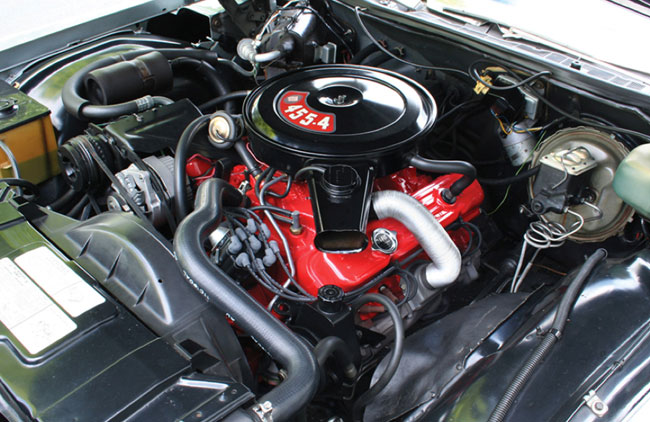
A fine motorcar is more than just styling—performance is imperative also. Under the hood you won’t find a standard six with 5 different V8 options. Riviera comes standard with a top-shelf 315 horsepower 455 cubic-inch 4-barrel V8 mated to a 3-speed Turbo Hydra-Matic 400 automatic transmission. While we’re not talking about a race engine here, the 455 V8 still powers the 4,428 pound Riviera smoothly and silently while achieving very respectable zero to 60 times in the 8 second range. The standard powertrain on the Riviera delivers stellar performance for a car of its size and heft. Buyers desiring the ultimate in high performance may choose the GS option including special ride and handling items, a 330 horsepower 455 and a specially calibrated transmission.
Straight line performance is important, but to produce a truly fine car you need the right combination of ride and handling to match the power. Driving a ’71 Riviera is a very impressive surprise thanks to a new feature named “AccuDrive,” a new suspension system that moves the steering arrangement forward and adds a new 4-link rear suspension. AccuDrive keeps the Riviera flat during cornering while maintaining the plush, soft ride personal luxury car buyers have come to expect. Power steering is variable rate assist with the same lock-to-lock ratio as the Corvette. You ride in silent, solid comfort while the Riviera remains quietly ready to handle whatever the road ahead will bring.
For the ultimate in control, Buick’s optional “MaxTrac” provides computer control power to the rear wheels. MaxTrac is designed to control excessive rear wheel spin during acceleration on snow, ice or wet pavement. When the system is turned on, a computer compares front and rear wheel speeds. The moment rear wheel spin is detected, the computer modulates the engine to control the wheel spin.
The Riviera has always been an exceptional personal luxury car, and as a sign of the
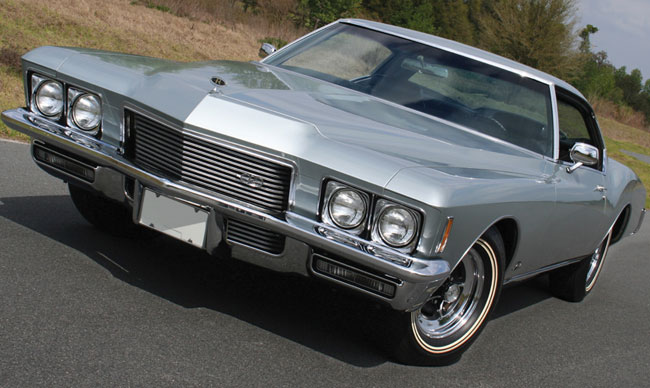
times, it grew larger over the years. The Riviera’s wheelbase had grown to 122” and
overall length was now 217.4”. The width swelled to 79.9” for ’71. The 1971 Riviera
is a big car, yet somehow the styling still appears somewhat trim and sporty. It’s a love it or leave it kind of styling, not right for everyone, still the market responded favorably with production of 33,810 units, very respectable considering this is Buick’s flagship and the most expensive car in the Buick lineup with a base price of $5,253.
While the exotic styling of the “boat tail” Riviera may be considered controversial to some, no one can deny that the styling stood out from crowd. It was interestingly clean yet daring, especially compared to the more mundane styling of today’s cars. When you package the styling together with great ride and handling along with very respectable performance, the Buick Riviera may just be one of the finest personal luxury cars ever produced.
|
|
 |
|
Installing rear Anti-Hop bars
The rear-end suspension plays a huge role in your car’s traction and straight-line performance. In addition to the springs, shocks, and control arms, rear traction
(anti-hop) bars can greatly increase and improve your power-harnessing capabilities. Stock components tend to fall a little short when it comes to handling high horsepower loads. Keeping the rear tires planted into the pavement is crucial during this front-to-rear transfer of power. Often times, the rear axle of the car will literally bounce up and down due to the lack of rear support and structure.
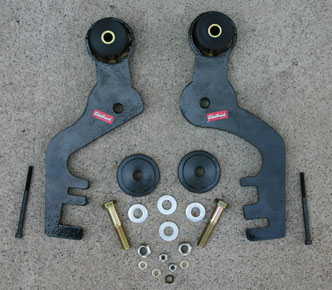
Edelbrock produces a great traction bar kit complete with urethane bushings, grade 8 hardware, and a clean powder coated finish. OPGI stocks this kit for 1965-’72 GM A-body vehicles, Part #CH22064.
Rear traction bars have been around the aftermarket scene for a long time, as they are tried and true performers. The relative design of the bars is simple.
They install onto the center of the rear axle carrier at the differential. The lower end of each bar is mounted into the webbing of the diff housing for added strength. The upper, bushed ends of the bars serve as the new mounting location for the upper control arm assemblies. By unbolting the control arms from their stock mounting points at the diff and moving them upwards, you decrease the amount of rear-end deflection and improve the overall geometry of the rear suspension. Just below the new mounting location, the anti-hop bars lock into the diff housing where the control arms were before. This design ultimately plants the rear tires of the vehicle downwards with a much greater force.
As always, break out the floor jack and throw the rear end of the car on some sturdy jack stands. A flat, level driveway or garage is optimum. Be sure to chock the front wheels before hoisting the car into the air. You will need as much room as possible to access the control arms and to install the traction bars. Removing the tires at this point may be a good idea. This will also allow more natural light into the confined work area.
Tip: When reinstalling the upper control arms, use a small amount of thread locker to prevent the nuts and bolts from vibrating loose.
|
|
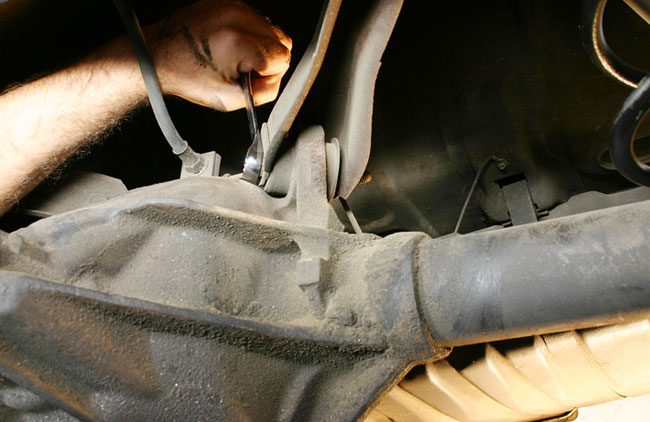
Loosen and remove the upper control mounting bolt from the rear end housing and bushing.
|
With the car firmly supported, locate the floor jack underneath the pinion area of the rear end housing. It’s highly important to maintain the pinion angle and support the assembly during the removal and reinstallation of the control arms. Start by removing the left (driver’s side) upper control arm from the rear end bushing. Slightly loosen the front mounting bolt as well to allow the arm to pivot. Carefully remove the bushing from the diff housing and set it aside. Using the supplied steel bushings, install the left anti-hop bar with the grease fitting facing the rear of the vehicle. The new bar will mount into the old control arm bushing location on the housing. Most traction bars come equipped with new control arm bushings already pressed-in and installed. Bonus! Simply attach the control arm to the upper end of the traction bar bushing. |
|
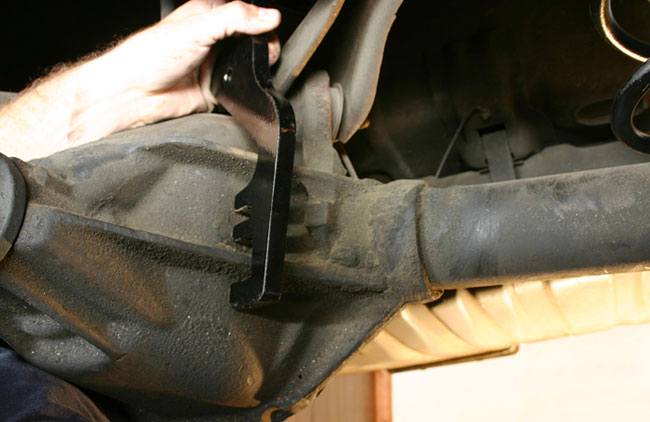
The lower end of the anti-hop bars is designed to mate and secure to the webbing of the housing.
|
|
To secure the lower end of the bar to the housing, you must first drill a 1⁄4” hole through the front webbing. You will notice the anti-hop bars have already been drilled-out for this purpose. Be sure to leave enough material between the hole and the edge of the housing for rigidity. Use the traction bar as a guide to mark and drill your holes. When completed, install the 1⁄4” bolts, washers, and lock nuts to the manufacturer’s specs. Return to the upper bolts and nuts and tighten to the specified torque value. Repeat the same procedure for the right (passenger side) of the vehicle.
There are a couple of things to keep in mind about installing aftermarket traction bars They are aftermarket pieces, not original. This means they often fit a wide variety of cars and require “slight” modifications such as grinding and additional drilling for them to work properly. But like we said, most of the time the modifications are fairly minor, not enough to discourage and scrap the whole project.
|
|
 |
|
Think you’re a wizard when it comes to all things GM A-Body?
Know all the trivia backwards and front? OK A-body guys – here’s a little quiz for you! Just 10 questions, and there are a few “gimmes” in here. But there’s also a few that may trip you up. Try to avoid using the Internet to pick up the answers. Maybe you can print these out, and test your know-it-all GM buddies. I’ll have the answers next installment of Colin’s Corner. There’s no prizes or accolades associated with this, just some good old fashioned entertainment. Have fun!
|
|
GM A-Body quiz:
1. Name 3 of the North American plant facilities in which GM A-Body vehicles
were manufactured (there were 6 in total)
2. Name 3 Pontiac A-Body models that were produced during the ’60s and early ’70s.
Bonus question: in 1971, which Pontiac A-body name was dropped, and what
new name replaced it?
3. The GM A body platform eventually morphed into a front wheel drive version.
What years was it a rear wheel drive platform?
4. What year were GM A Bodies allowed to employ more than 400 cubic inch engines?
5. Name the two station wagons that were built on the A-body platform (in the 1960s and
early ’70s) that used stretched wheelbases and raised rear roof sections with skylights.
6. What were the largest cubic inch engine displacements ever offered in the
Chevelle, GTO, Cutlass, & Skylark?
7. What body style was the Chevrolet El Camino based on?
8. Name the high performance versions of the Chevrolet, Pontiac, Oldsmobile,
and Buick A-Bodies.
9. Was the 1970-72 Monte Carlo officially classified as an “A” Body?
10. The A-Bodies manufactured between 1964 and 1972 were all based on the same GM corporate platform, but shared very little in the way of major body components and panels. Name one major item that was common to all A-body divisions.
|
|
 |
|

Vintage Advertising
Here’s something different. A collection of vintage GM ads from the 1960s and early ’70s. It’s interesting to see how different automobile ads were back then, compared to today’s ads. “Lifestyle” seemed to be the theme back then. Families taking vacations, people fishing, skiing, etc.
In a not-so-welcome stark contrast to the wonderful, colorful ads of yesteryear, today’s car ads all seem to feature dark gray cars set against moody backgrounds. I hope you enjoy these snippets of GM history – a glimpse into our past!
Click on ads to view larger.
|
|