|
Chevrolet SS
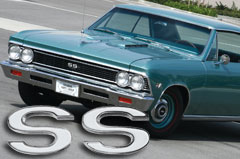
When it comes right down to it, Chevrolet’s storied performance
history can be summed up in two simple letters— “SS”.
Sure, names like Chevelle, Camaro and Nova conjure up visions
of tire-smoking prowess. And of course, cubic-inch call-outs
such as “396”, “427” and “454”
all bring to mind big torque and power. But the “SS”
moniker is the all-encompassing term that will forever symbolize
not only power and performance, but a level of pure class as
well.
Where did it all start? In 1961, with the introduction of the SS
option on the full-size Impala. This was the year the legendary
409 cube V8 came into play as well. The SS/409 combination
was Chevy’s response to Ford’s 390 powered Galaxie.
You might say 1961 was the year that the serious horsepower
wars began!
Over the rest of the ’60s and on into the ’70s,
the SS package was offered on many different Chevrolet models.
Good thing too, as competition from Ford (with their GT and
XL models) and Mopar (with their R/T packages) was always
a threat in the showrooms and at the drag strip.
The SS option/model always offered an upscale appearance,
and in most cases, a variety of high-performance engines and
suspension upgrades. This short “tid-bit” from
Colin’s Corner won’t get into all the engines
and sets of features that came on every SS-optioned car that
Chevrolet ever offered (that would take an entire book!) Instead,
we’ll cover the years the SS major players were offered.
1961: The full-size Impala started it all.
1962: Impala.
1963: Impala, Chevy II Nova.
1964: Impala, Chevy II Nova, Chevelle.
1965: Impala, Chevy II Nova, Chevelle.
1966: Impala, Chevy II Nova, Chevelle.
1967: Impala, Chevy II Nova, Chevelle, Camaro.
1968: Impala, Chevy II Nova, Chevelle, El Camino, Camaro.
1969: Impala, Nova (the “Chevy II” name was discontinued for ’69), Chevelle, El Camino, Camaro.
1970: Nova, Chevelle, El Camino, Camaro, Monte Carlo.
1971: Nova, Chevelle, El Camino, Camaro, Monte Carlo.
1972: Nova, Chevelle, El Camino, Camaro.
1973: Nova, Chevelle, El Camino.
SS model notes:
• Impala SS was discontinued after the 1969 model year. It resurfaced from 1994 through 1996, then again in 2004 through 2009.
• After 1973, the Laguna S3 coupe replaced the “SS” as the sporty/performance option on the Chevelle.
• Camaro SS was discontinued after the 1972 model year
and wouldn’t reappear until 1996.
• El Camino: Interestingly, even though the El Camino SS was a relative late-comer to the storied SS fold (1968), it continued the longest, running throughout 1987.
• Although the original Monte Carlo SS only appeared
for a couple of brief years (1970-’71), it turned up
again from 1983-1988, and then in 2000-2007.
• Nova SS continued throughout 1976.
Sure, Chevy has had other “muscle” monikers over
the years: RS, Z28, IROC, LTZ, L88, etc., but the legendary
SS casts the tallest shadow of them all!
Don’t forget, when it comes to Chevelle and El Caminos,
SS or not, Original Parts Group has every reproduction part
you’ll ever need to complete your stock or modified
build. There’s plenty of cheaper, inferior quality parts
out there, but why would you ever use them on a car with such
a storied past?
|
| |
|
How-To: Steering column removal, inspection, and refinishing
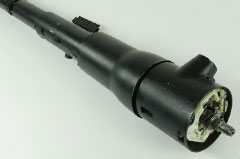
This project will help you get your steering column back to
looking factory fresh and operating like new. We will cover
removal of the entire column, checking the bearings, re-painting,
and re-installation. It can all be done with some basic skills
and a few simple tools (Philips screwdriver, flat-blade screwdriver,
12-point wrenches, socket wrenches, and a steering wheel puller).
The project took us approximately 3 hours, not including overnight
paint drying time.
Of course, if your steering column is beyond repair, Original
Parts Group carries brand new replacement units for all 1964-’72
GM A-Body vehicles. OPGI also stocks the parts you’ll
need for a partial re-build or a complete overhaul— including
gears, seals, bearings, even lower steering column covers.
Tip: Grab another person to help pull the steering
column through the firewall. This can be done by one, but an
extra set of hands always helps.
To disconnect the base of the steering column from the gearbox,
remove the two steering coupler nuts and bolts.
(Picture 1)
The steering coupler acts as a rubber isolator between
the steering shaft and gearbox that eliminates road vibration
through the steering wheel. At this stage, you must also remove
the pin that retains the park “lock-out” arm assembly.
(Picture 2)
The park lock-out arm prevents the transmission
from shifting out of park, unless the ignition key is in the
“on” position.
At this point, disconnect your car’s battery. Now, inside
the car, using a Philips screwdriver, you’ll need to remove
the horn pad (the design can vary from vehicle to vehicle).
Disconnect the horn wire assembly. The wire terminals are “push-in”,
and will easily pull out of the inner horn contact. Then, bracing
the steering wheel, remove the 7/8” steering wheel nut.
Now, we want to remove the steering wheel itself. The spline
of the upper steering shaft is tapered, securing the wheel.
Therefore, a steering wheel puller must be used (available at
most auto parts stores). Following the manufacturer’s
instructions, pull wheel directly off the spline.
Using a Phillips screwdriver, remove lower steering column cover.
Then unplug the turn signal wiring harness. Remove four 3/8”
sheet metal screws that retain the firewall seal, leaving the
seal attached to the steering column. Remove two 9/16”
upper column bolts. Lower the column, and unplug ignition switch
wiring harness. Rotate the steering column to clear the park
lock-out arm (through the hole in the firewall) and remove the
column.(Picture 3-4)
Back with the Philips screwdriver, remove the anti-theft lock
cover at the top of the column. With a flat-blade screwdriver,
pry and remove the C-clip, then remove the locking steering
ring. Remove turn signal/canceller/inner horn contact. Then,
remove the turn signal lever and the ignition cylinder lock.
Now remove the three screws that retain the signal switch assembly,
then unscrew (by hand) the hazard switch located on the side
of the column and set aside.(Picture 5)
It’s time to check the bearings. Turn the steering shaft
by hand (both the upper and lower portions of the shaft). It
should rotate smoothly and freely in either direction. If there
are signs of excessive “play” (more than 1/8”
in either direction), grinding, or rubbing, chances are the
bearings need replacing. Unless you are skilled in this area,
we suggest consulting a specialist regarding bearing replacement.
If everything seems OK with the bearings, we can now prepare
the entire column for painting. Smooth out any gouges or scratches
left by dangling keys with a fine grit (500 or higher) sandpaper.
Wipe the unit down with a non-petroleum based cleaner, and dry
with a lint-free cloth. In a well-ventilated area, spray the
column with primer. Let dry approximately one hour. Then paint.
We used two coats of black acrylic lacquer and let dry overnight.
As a separate unit, re-paint the upper steering column bracket
at the same time.
Make sure the cylinder lock is re-installed, then replace: 1.
turn signal lever, 2. turn signal/canceller/ inner horn contact,
3. locking steering ring and C-clip, 4. anti-theft lock cover,
5. hazard hand switch, 6. ignition switch, 5. the upper steering
column bracket, and 6., the tilt-column lever (if applicable).
Our “restified” column is now ready to be reinstalled.
The column is slipped back in through the firewall the same
way it was removed. Be sure to re-connect the ignition and signal
switch wiring harnesses. Make sure the upper column bolts are
re-attached as well as the four firewall seal screws.
Re-attach the steering wheel, and tighten the 7/8” steering
wheel nut using the socket wrench. Re-attach horn wire contacts
and horn pad.
Although we have covered how to check for bearing wear, we have
not gotten into upper and lower bearing replacement. This is
a fairly complex procedure that could involve disassembly of
the entire column. If you determine that your bearings require
attention, we suggest consulting a professional.
With your column looking fresh and ready for the show circuit,
we’ll bet you’ll never use a set of dangling keys
again!
|
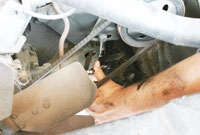
1. Using 12-point wrenches, we disconnect two steering
coupler nuts and bolts.
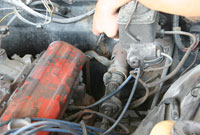
2. Remove the pin that retains the
park “lock-out” arm assembly.
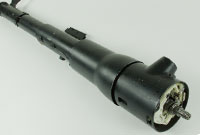
3. Our steering column removed. We have also removed the ant-theft lock cover, the locking steering ring, the hazard hand switch, the ignition cylinder,
and the upper steering column bracket.
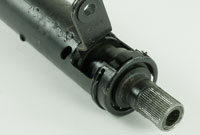
4. The end of the shaft. Note the sharp edges on the spline. Rounded edges indicate a need
for replacement.
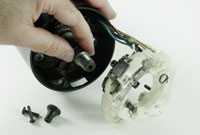
5. With the cancel cam/horn
contacts removed, we rotate the shaft by hand, checking
for excessive play.
|
 |
|
Rochester Quadrajet 101

I’d be shooting blindly by guessing how many of you out there have
stuck with your original (or rebuilt) Rochester Quadrajet carburetor.
Let’s face it, it was GM’s mainstay carb throughout
most of the musclecar era. Heck, not just on musclecars either.
Any GM car or truck that needed a V8 with some extra oomph for
hauling or towing came with one of these babies too. Of course,
there are many aftermarket carburetors on the market today,
and just as many folks have elected to toss their old Q-Jets
in favor of one of them. Just check out one of our OPGI catalogs—in
any one of them there’s close to a dozen pages packed
with “state-of-the-art” carbs and related parts
and accessories from the likes of Edelbrock, Holley, and Barry
Grant.
There’s
no denying though, that Rochester’s 4-bbl unit was the
forefather of them all, and that’s what came on your GM
A-Body from the factory. Here we’ll pay a little homage
to the legendary Quadrajet, which are available as SMI rebuilt
units from OPGI.
Introduced in 1965, the Quadrajet is the only four-barrel carburetor
that performed well during the 1960s, through tighter emissions
in the 1970s, and lent itself to electronic feedback in the
1980s. The Quadrajet takes advantage of its “spreadbore”
design to offer relatively good fuel economy and outstanding
performance.
“Spreadbore” means that the carburetor has small
primary bores and much larger secondary bores. Most versions
have 1-3/8” diameter primaries (very few had 1-7/16”
primaries) and all have giant 2-1⁄4” secondaries.
During normal driving, the engine operates off the small primaries.
Following the laws of physics, the higher the velocity of air
through the venturis, the more efficiently you can meter fuel.
With the small primaries in this carb you can take a 5000 pound
Cadillac and achieve 16-17 mpg, which is not bad at all considering
the heft of the vehicle. When the throttle gets mashed however,
the huge secondaries open and then, well, say bye-bye to fuel
economy. But how much fun this is when you’re rolling
in a 3500 pound GM A-Body!
The “air valve” type secondary had two controlling features:
• The secondary throttle plates are directly controlled
by the gas pedal. You can bang them open on demand.
• The air valve plate at the top would open in reaction
to the open secondary throttle plates at the bottom. The opening
rate is crucial.
The “Q-jet” is an excellent overall performer, and
is very tunable to do whatever you would like to do with it.
It has been said that Rochester Products manufactured about
120,000,000 Quadrajets in about 30 plus years. That’s
quite a legacy!
|
Rochester Carburetor Flow Ratings
|
CFM
|
| Quadrajet: Air flow at 90° air-valve opening |
| 1-3/32-in. venturi (primary) |
750 |
| 1-7/32-in. venturi (primary) |
800 |
| |
| Dualjet |
| 1-3/32-in. venturi |
227 |
| 1-7/32-in. venturi |
287 |
| |
| Varajet (staged 2 barrel) |
| 28mm primary |
375 |
| 30mm primary |
397 |
| |
| Model 2G: 1-1/4-in. flange, 1-7/16-in. throttle bore, |
| 1-3/32-in. venturi |
278 |
| |
| Model 2G: 1-1/2-in. flange, 1-11/16-in. throttle bore, |
| 1-3/16-in. venturi |
352 |
| 1-1/4-in. venturi |
381 |
| 1-5/16-in. venturi |
423 |
| 1-3/8-in. venturi |
435 |
| |
| Model 4G: Throttle bore & venturi size in inches |
| 1-7/16 – 1-1/8 primary; 1-7/16 – 1-1/4 secondary |
486 |
| 1-7/16 – 1-1/8 primary; 1-11/16 – 1-15/32 secondary |
553 |
| 1-9/16 – 1-1/8 primary; 1-11/16 – 1-15/32 secondary |
692 |
| |
| Monojet |
| 1-7/16-in. throttle bore, 1-7/32-in. venturi |
160 |
| 1-11/16-in. throttle bore, 1-5/16-in. venturi |
210 |
| 1-11/16-in. throttle bore, 1-1/2-in. venturi |
250 |
|
 |
|
Colin’s Corner Project 1969 Buick Special Update!
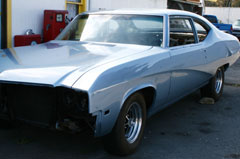
In my first installment of Colin’s Corner, I made mention
that my beloved ’69 Buick Special was getting totally
gutted and redone. Not a rotisserie resto, but darned close.
This car was actually pretty nice (notice I used the word “was”),
as you can see by the photos. Lots of folks called me crazy
for tearing it all apart again, but let me explain.
Sure, the car was literally about 80% done. Over the past 9 years
(on and off), friends and I have done a lot of work on it. The
Special is packed with OPGI restoration parts too— everything
from interior items to suspension parts to trim and weatherstripping.
Lucky for me, Original Parts Group carries just about everything
I’ve needed to get this car restored the right way (as
side note here: you Buick owners have to check out OPGI’s
selection of center grilles for various years and models of
Skylark. I have one in the Special, and it rocks!) Anyways,
a couple of very minor interior items and an engine rebuild
would have finished her. And I would have ended up with a real
nice driver. Something I could have cruised every day of the
week if I’d wanted to. The paint wasn’t 100% perfect,
but hey, it’s supposed to be a driver, right? If I’d
picked up a stone chip or two, I wouldn’t lose any sleep
over it. Sounds kinda nice, doesn’t it? A cool car you
can live with on a daily basis. Well, that was my original intention
anyway...
Then one bright sunny day last summer, as I was replacing the
firewall insulation pad (another OPGI part), I stood back and
took a real long hard look at the Special. Something came over
me. A feeling that excited me and scared me at the same time.
By no means were the car’s body and paint perfect, I already
knew that. But suddenly I was seeing things I’d never
seen before. Nothing major, just some relatively minor imperfections.
I wanted to just shrug it off, but couldn’t. That annoying
perfectionist side of me was taking over again!
Over the next week or so, I made up my mind to dismantle everything.
I struck a deal with Apland’s Auto Body in Grants Pass,
Oregon. I would do the teardown, and turn the car over to them
for a complete re-working of the body and a show-stopping paint
job.
What I wanted to show you here was the car after it was stripped,
in primer, awaiting final sanding. As of this posting, Apland’s
schedule has us about a month or so away from the paint booth.
Look for an update in the next installment of Colin’s
Corner. Oh, and yes, she’ll be back in her old shade of
Crystal Blue!
|
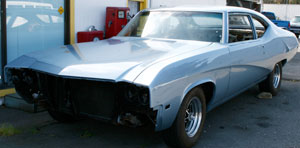
Yep, the door/trunk lock assemblies and window regulators have been removed too.
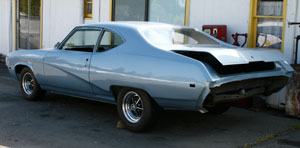
The
mighty Special with most of the trim removed.
The interior has also been completely gutted
at this point, including the headliner and carpet.
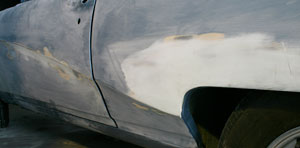
At Apland’s
Auto Body.
The car goes through a complete sanding,
revealing uneven spots. The Buick Special’s
bodylines are particularly complex and
need a lot of attention and finessing.
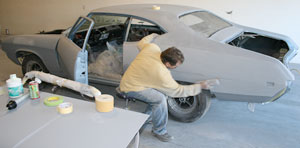
Randy at Apland’s gets down to
the nitty gritty after over 60 hours
of sanding. The deck lid sits on a stand in
the foreground. The car was treated to
2K Urethane Gray Primer by Eastwood.
The engine has also been removed at this point. Original Parts
Group has supplied new engine compartment items (master cylinder,
washer pump assembly and wiper motor assembly) that we’ll
install after paint. Stay tuned as we keep you updated on the
project Special!
|
|