|
I've got the Blues...
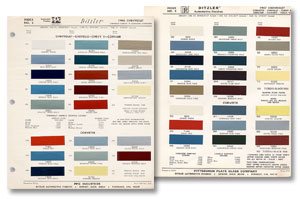
Last issue of Colin’s Corner, I introduced you to my project
vehicle—a 1969 Buick Special (entry level Skylark). The
car is painted a beautiful shade of what I would call a “medium
silver-blue”. Technically speaking, it’s known as
“Crystal Blue” (code 53). I can’t tell you
the number of people who swear up and down that it’s called
“Marina Blue”. No, I tell them, it’s a Buick
color, not a Chevrolet hue. I usually get a look that says “you
don’t know your colors, man”.
Working at OPGI for more than a few years, one develops a pretty hefty
knowledge base of the GM-A Body cars. At Original Parts Group,
we have to be experts in the field—after all, what good
is it when a customer can’t rely on you for accurate information?
We deal primarily with restoration and performance parts and
accessories, so the subject of paint colors and codes doesn’t
come up that often. But when it does, somehow Marina Blue always
enters the conversation. It’s just one of those colors.
I remember being at a big OPGI-sponsored car show a few years
back. It was an all-GM show (of course), with just about every
brand of The General being present. I came across a couple of
guys gushing over a pretty blue ’65 Impala. “Marina
Blue - awesome color” I heard. Wrong-o. I also remember
a buddy of mine, years ago, telling me that his buddy had a
’70 Cutlass in Marina Blue”. Mmmm, sorry. I’ve
even heard “knowledgeable” friends say they’ve
seen ’68 and ’69 Chevelles in MB. Seems this color
sure did get around a lot! Colin’s Corner Truth be told,
the Marina Blue name is reserved for the Bow-Tie brand. And
only for 2 short years: 1966 and ’67. Sure, Chevrolet
was leading up to MB in ’65 with Nassau Blue and even
Mist Blue. Marina Blue (GM code F) was officially introduced
in 1966 models of full-size Chevrolet, Chevelle, Chevy II and
Corvair. The Corvette got Nassau Blue - close. In ’67,
MB was available on all Chevy models - full-size, Chevelle,
Chevy II, Corvair, Camaro, Nova SS and Corvette.
In 1968, the closest color to MB Chevrolet produced was Tripoli
Turquoise. 1969 saw Azure Turquoise. 1970-’72 was Mulsanna
Blue, getting ever further away from the legendary Marina Blue.
Other GM marques had their own “versions” of MB.
In 1967, Pontiac had Tyrol Blue (code F). In 1966 and ’67,
Buick offered Blue Mist (code F), and in ’67 your could
order Ermine Blue (also code F) on an Oldsmobile.
Of course, the really cool thing about paint colors back in
“the day” was the variety. Just for a little time
trip, log onto www.autocolorlibrary.com sometime. Check out any of the GM brands from the 1960s and early ’70s. Just about every year offered
at least 3 or sometimes even 4 different shades of blue. Compare
that to today’s offerings. Blue? Sure, probably. But just
oneshade, hey, let’s not get carried away!
|
| |
|
Headlight bezel re-furb...
Headlight bezels are one of those items that are literally “out
there”. Out there, at the front of your car, taking the
hits. Stone chips and dings can make your otherwise beautiful
car look like a road weary warrior.
Sure, if you own just about any year Chevelle, OPGI has fresh
new factory-correct headlight bezels for your ride. But, if
your car is a little more off the beaten path - like my project
’69 Buick, new bezels aren’t on the menu, yet. In
this installment of Colin’s Corner, I’m going to
show you how I took the budget approach to re-finishing my existing,
tired and beat up headlight bezels. Costs to do this are at
a minimum (we all like that part); all it requires is a little
time and effort and you’ll be ready for the car shows
again!
|
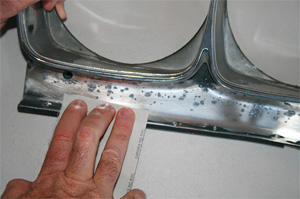
I knocked down the majority of those pitswith a nice combination of
sanding materials. I started with 150 grit Emery Cloth,
then moved to 320 grit waterproof sandpaper, then to a super-fine
600 grit. Some of the deeper, stubborn pits in my headlamp
bezels I was able to smooth out faster with steel wool.
I started with a coarse #1 grade, then moved to a #0 grade.
Very labor intensive,but worth every gnarled fingertip. 

Satisfied
that I had all the pits filed flush,
I proceed to the masking stage. Using
3M’sBlue painter’s tape, I carefully
masked off everything except the
outer part of the bezels.
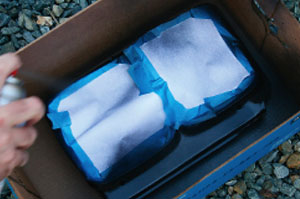
Before
applying paint, I took a cloth
dabbed in some Simple Green De-greaser
to the bezels (to avoid fisheyes in
the paint). I took the bezels outside and applied 3 light
coats of Rust-oleum
Semi-Gloss Black (#7798). Each day,
for the next 2 days (waiting 24 hours between coats), I
re-applied until I had a nice,smooth overall coating.
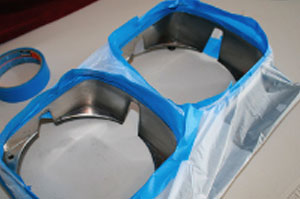
After letting the outer black area of the bezelsdry solid as a rock (48 hours), I
mask off tha tarea, and of course the raised, chrome platedsections, and
prepare to paint the inner areas that surroundthe headlights.
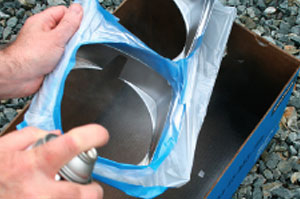
Using
Rust-oleum’s “Aluminum” spray paint
(#7515),
I hit the inner bezels with a few
light coats. Let dry for 24 hours. Repeat, taking care to
cover every nook and cranny.
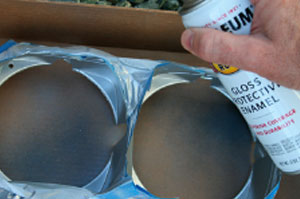
To “knock-down” some of the
Aluminum paint’s brightness, I hit the
whole area with a very light “dusting”
of Rust-oleum’s Smoke Gray (#7786).
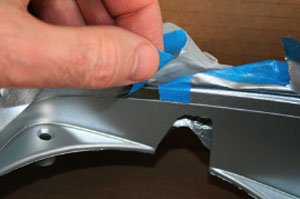
The masking tape is VERY carefully
removed. Go slow!
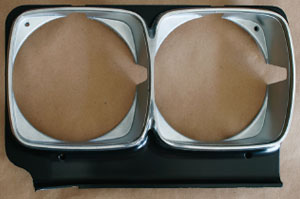
The
finished bezels look pretty much factory fresh. Granted,
I haven’t taken
out every last remaining sign of pitting, but I’ve
come pretty darn close. Hey, spend $700-$800 with the pros,
or do it yourself and get 99% there for cheap - your choice.
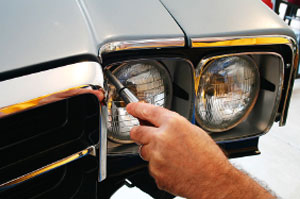
The refurbished
bezels are re-affixed and look terrific. Should be good
for another 40 years!
|
 |
|
How to install a cowl induction system

Does a working cowl induction system add more horsepower to
your Chevelle? Actually, no. But it sure looks awesome, and
it’s doesn’t require years of wrenching experience
to install.
Whether your car was originally cowl induction equipped or not,
we’ll show you how to install the complete system. In
a few hours, with some basic tools, you’ll be flashing
warning signs to all the other muscle on the street.
|
|
All of the parts we’ll need are available from Original Parts
Group: hood, cowl induction door assembly, hood screen, air
cleaner spacer, cowl induction air cleaner assembly, a/c intake
relay, a/c wing nut, vacuum actuator, vacuum actuator support,
c/i wiring harness, firewall grommet, valve frame kit, air control
switch and bracket, flow control valve, hood pins (if desired).
Tip: Whether you’re using your existing
cowl equipped hood or a brand new one, you should remove the
hood from the car and place it upside down on a firm level surface,
at least a foot off the ground. You can install the system with
the hood still attached, but it’s much easier when removed.
Hood removal is very simple, and you will need two people to
do it. Unscrew the 4 bolts that retain the hood to its hinges,
and carefully lift.
First, a few words of advice and precautions:
-
A cowl induction system can be installed on any ’70-’72
Chevelle that is equipped with a four-barrel carburetor. This includes the following engines: 350, 396 and 454.
-
You’ll want to prime and paint your hood before
installing the cowl system. Be sure to paint the cowl door and
screen body color.
-
Be very careful working around the underside of the
hood. It is stamped sheet metal, and all the edges are very
sharp!
-
When reinstalling the hood, make sure you line it up
correctly on its hinges. This is done by lightly tightening
the bolts, then gently shutting the hood to check
for fit. Once you’re satisfied, tighten all 4 bolts with
a socket wrench.
In our first step, we’ve inserted the valve frame cage
flap into the valve frame cage using the 3 supplied retaining
clips. We’ve also inserted the electric solenoid into
its pre-attached retaining bracket. All the parts necessary
for this step are included in OPGI’s “complete valve
frame setup”.
With the cowl induction hood placed upside down on a firm surface
and raised off the ground, insert the assembled valve frame
setup into the hood opening. Secure with the 6 supplied self-tapping
screws using a 5/16” socket wrench.
Next, we insert the firewall grommet into the pre-stamped hole
in the hood, and feed the tan colored wire from the wiring harness
through the grommet. Then, attach the tan colored wire terminal
to the solenoid. You will access the solenoid through the large
air cleaner hole in the center of the hood.
Now we will assemble the hood door. Attach the 2 door supports
(one at each side of the hood door) using the supplied bushings
and pivot screws. The cowl induction hood door assembly kit
is available from OPGI. Even with the screws fully tightened,
the door supports will feel loose and not really firmly connected
to the hood door. This is normal, as the hood door must be allowed
to open and close freely.
Now that the hood door is assembled, we’re going to install
it into the hood. Lay the hood door into the pre-stamped hole
in the hood, and attach it by screwing 4 (2 each side) 3/8”
self tapping bolts through the hood door supports. NOTE: due
to irregularities in metal stampings, you will need to shim
the door supports (using washers) in order to properly align
the hood door. Look under the hood (actually, on top of the
hood) and make sure that you shim the door so that it sits flush
with the hood surface!
Before you finally tighten down those door supports, make sure
the hood door is able to open and shut freely! There should
be at least 1/16” of clearance between the door and the
actual hood. Don’t forget to take into consideration the
thickness of new paint!
Next, insert the vacuum actuator into the vacuum actuator support
and fasten to the hood using 4 1/4” self-tapping bolts.
Then, attach the vacuum actuator “throw” to the
cowl hood door using the supplied screw.
Now that we’ve got all the hood hardware in place, we’re
going to attach the cowl hood screen to the rear of the hood
opening using 8 self-tapping screws. This will keep out those
pesky leaves and unusually large bugs!
Because there’s no vacuum in the system yet, the door
will remain in its open position.
You may be wondering why your ’70-’72 A-body has
three big gaping holes in the cowl grille area (just below the
windshield). Well, they’re obviously for air flow, but
for some strange reason the factory left them open and unprotected.
To keep out leaves and other extraneous junk, you may want to
invest in a set of cowl grill inserts (also available from Original
Parts Group). They simply snap into place.
The entire hood should be reattached to the car at this point.
Have a friend help, and take your time to make sure both sides
of the hood align properly with the fenders.
Now we’re going to get the whole system activated. If
wire routing and switch installation intimidate you, you’re
in for a treat here. This is a pretty simple set-up. Just follow
along.
Attach the air cleaner intake valve relay assembly to the firewall
using a #10 self-tapping screw. This unit sends a “hot”
signal from the wiring harness to the cowl induction solenoid.
There’s a black colored “plug” located in
the firewall just behind the engine’s valve cover. Pop
it open and insert the pink and brown colored leads from the
wiring harness, as well as the braided section of wire. The
pink and brown leads will feed down and attach to the air control
valve solenoid switch, which we will install at the gas pedal.
The braided section of the wiring harness will also feed down
and attach to the car’s existing wiring harness. At the
gas pedal, you will need to remove the existing retaining plate.
Attach the air control valve solenoid switch to its bracket
using the supplied screw. Now fit the bracket to the existing
holes where you removed the retaining plate before. The protruding
post on the side of the solenoid switch will press against the
gas pedal linkage upon full throttle acceleration, actuating
the vacuum and opening the cowl hood door.
Attach the pink and brown wire leads to the terminals on the
solenoid switch (the fitting shape will be obvious), and attach
the braided section to the existing wiring harness under your
dash. This last connection will provide power to the entire
cowl induction system.
Back in the engine compartment, plug the 2 remaining short wires
into the air cleaner intake valve relay assembly (again, the
fitting shape will be obvious). Now route the tan colored wire
(that attaches to the electric solenoid we installed at the
beginning of this project) through the wiring sheath on the
firewall to protect it.
You’ll need to place the cowl induction spacer assembly
on top of the carburetor. This ring simply sits atop of the
carb, and allows the air cleaner to sit up a little higher,
into the cowl hood.
Attach the cowl induction air cleaner flange and seal kit (part#KC1500
black lid) or (part#KC1501 chrome lid).
Now you’ll have to fit a 1/4” rubber hose (not included
in kit, but available from any auto parts supply store) to the
vacuum actuator. Then route the hose to fit the other end to
the vacuum port located on the intake manifold just behind the
carburetor. The vacuum port is standard on all Chevelles, as
it is used for other vacuum operated accessories.
Fire it up and grab a few shifts. Watching that cowl door open
under full throttle makes it all worthwhile!
|
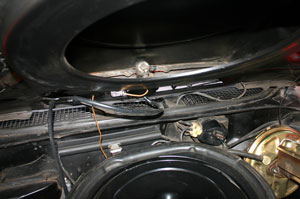
Pic 1: The cowl induction system on this Chevelle is straight out of 1970. You can see the valve frame setup in the hood opening.
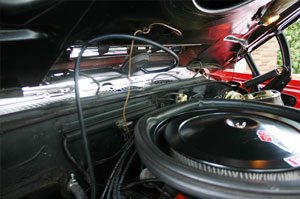
Pic 2: The 1/4” rubber hose attaches to the vacuum
actuator. The other end routes to the vacuum port located
on the intake manifold just behind the carburetor.

Pic 3: At rest, the hood door is supposed to stay open, because
there’s no vacuum in the system.
|
 |
|
The First Hurst/Oldsmobile
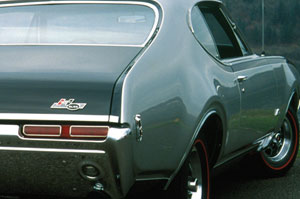
Ever hear the story of how the first Hurst/Olds came to be?
It’s a good one. I’ll give you the Cliff’s
Notes version here: Back in 1968, John Beltz, Oldsmobile’s
chief engineer, wanted to boost the performance image of his
division’s A-Body. Hurst-Campbell and Mr. Beltz got together
and decided to slip a batch of “breathed on” Toronado
455s V8s between the fenderwells of 515 Cutlass 4-4-2s. With
Hurst installing the mega-motors, not Oldsmobile, they had squirmed
around GM’s corporate edict banning engines of more than
400 cubes in the GM intermediate body style.
But it was already the end of April, 1968, and very close to the end
of the model year production. The H/Os had to be built and shipped
out to dealers in time to serve as end-of-the-year traffic builders.
If the cars arrived in showrooms after the ’69s were out,
they would be of no use to Oldsmobile. Lansing industrialist
John Demmer provided warehouse facilities in which the cars
were built; a crowded, makeshift assembly line was forged and
local suppliers were put on full scale alert. Amid cries of
protest from the marketing folks at Oldsmobile, 515 Peruvian
Silver H/Os were hustled together in just under a month. Marketing
thought the entire program was a complete waste of time and
money, claiming the cars would never sell. Two days after Olds
announced the availability of the car, more than 900 orders
came pouring in. The next day the order tally hit 2600! Supply
and demand was seriously out of whack, and a lot of dealers
were left out in the cold. The ’68 Hurst/Olds stepped
into the history books as the rarest H/O ever produced.
Cranking out 390 horsepower and a road-ripping 500 ft.lbs. of
torque, this firebreathing musclecar could chew up just about
anything on the road. With a 10.5:1 compression ratio and 3.91:1
gears harnessing all that torque, the H/O was good for mid-13
second quarters all day, all the while lavishing its cargo in
traditional Olds comfort and prestige.
The ’68 Hurst/Olds was the first and fastest in a long
line of legendary Oldsmobiles produced in conjunction with the
Hurst-Campbell company. Only 515 of these cars were built. After
the ’68 model year, all future H/Os would increase in
production, and decrease in power. Lowest production numbers,
an understated appearance package, and a rated 390 horsepower
make the first H/O the most collectible of all.
If you happen to be restoring one of these beasts, or are thinking
about possibly turning your Cutlass into an H/O clone, keep
in mind Original Parts Group has pretty much every restoration
part you’ll need to get the job done. Of course, OPGI
stocks all the “standard” Cutlass restoration items
(inside and out), but we also carry the more unique stuff -
from H/O deck lid and fender emblems (for the ’68-’72
cars), to those cool bright red inner fenderwells!
|
 |
|
Top 5 little known facts about the first Hurst/Olds
-
Of the 515 cars built, 459 were Cutlass Holiday 2-door
hardtops. 56 were 2-door post coupes.
-
All 515 ’68 H/Os were hand pinstriped by one man;
Paul Hatton. Hatton did them all in one month, and
charged $20 per car. That’s over $10,000 for one month’s
work!
-
The 455 cubic-inch engines were pulled directly from
the Toronado line, and were purposely assembled
with incredibly loose piston clearances of 3-4 thousandths of
an inch.
-
Only the first car was equipped with a 4-speed manual
transmission. It ran the 1/4 mile in 12.97 sec.@108
mph. All other ’68 H/Os came with the TH400 auto and the
Hurst Dual Gate Shifter.
-
All were painted Peruvian Silver (code ZZ); a “Toronado
only” color.
|
|